 Pin this
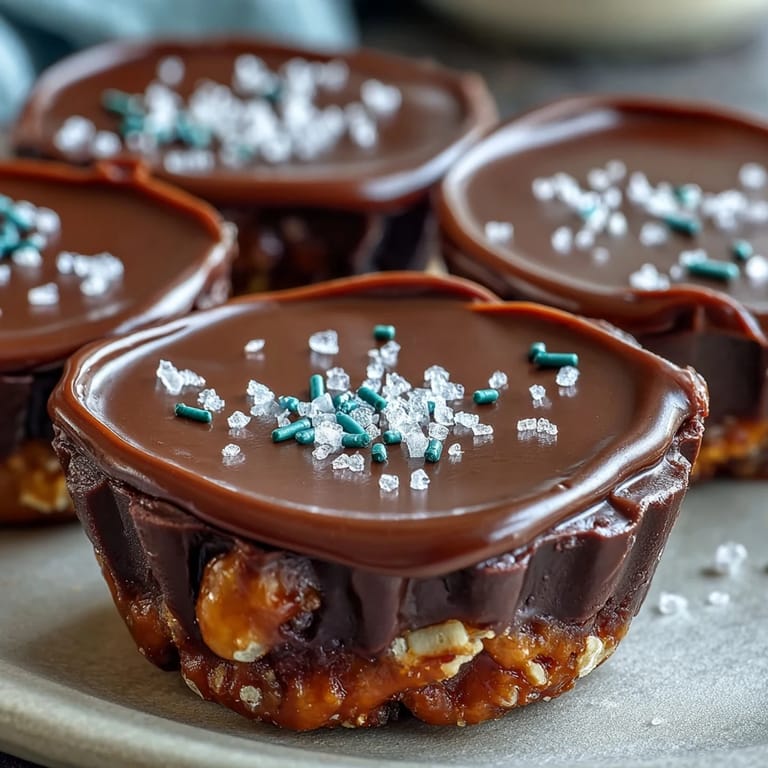
 The first time I made these peanut butter eggs with crunchy pretzel crusts, the kitchen was filled with the scent of melted chocolate and toasted pretzel crumbs. The process was pleasantly messy—pretzel bits ended up everywhere, and I realized halfway through that I'd forgotten to buy muffin liners. No bother: I improvised by using parchment paper, which made the cups look rustic and charming. I couldn’t help but taste the filling as I went, and the salty-sweet bite instantly reminded me why these treats are irresistible. Even the quiet hum of the fridge seemed excited for the cups to set.
I once brought a tray of these peanut butter eggs to an impromptu spring picnic with friends, forgetting to warn everyone about their addictive qualities. By the time I turned around, most were gone, and even the serious chocolate snob in our group admitted they were a hit. Watching everyone debate whether the salty pretzel or the peanut butter was the true star made the experience even sweeter. It was one of those effortless afternoons where homemade treats turned into laughter and friendly rivalry.
Ingredients
- Salted pretzels: Crushing these finely ensures a sturdy and crunchy crust—if you use a food processor, pulse gently and don't overblend.
- Unsalted butter: Melting makes the crust come together perfectly, and I've found that using unsalted lets you control the saltiness better.
- Granulated sugar: Adds just the right touch of sweetness to balance the salty pretzels.
- Creamy peanut butter: Choose a brand that's smooth for a classic filling, but don't be afraid to try chunky if you like a bite.
- Powdered sugar: This blends seamlessly with the peanut butter, keeping the filling soft and not grainy.
- Pure vanilla extract: A splash helped me realize how much flavor it brings to the peanut butter layer.
- Semi-sweet chocolate chips: Melting chips creates a glossy topping—don’t skip stirring between microwave bursts for silky results.
- Coconut oil or vegetable oil: This trick is key for smooth, shiny chocolate that doesn't crack.
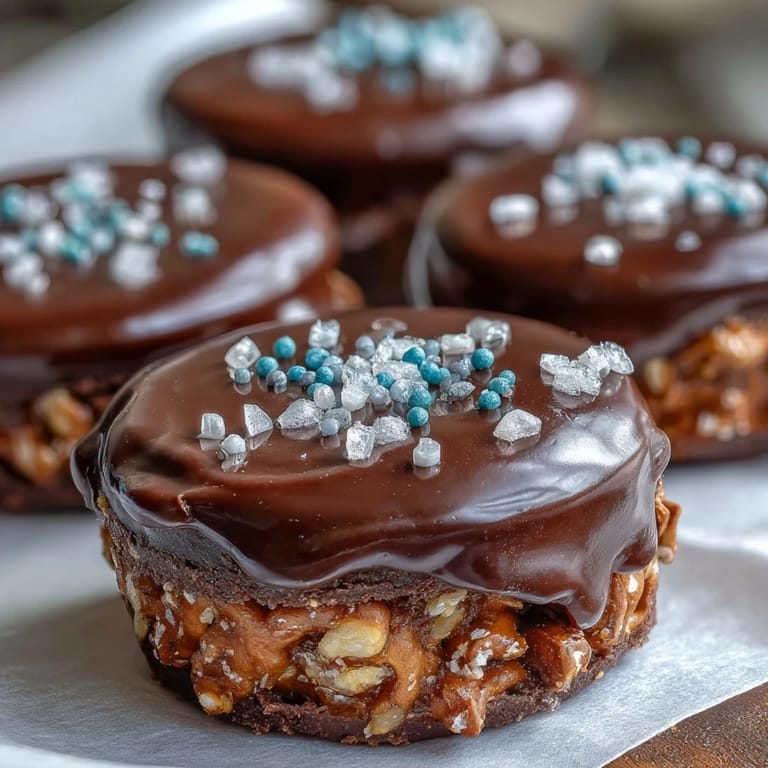
- Colored sprinkles or flaky sea salt (optional): Use sparingly—they dress up the cups and add texture.
Tired of Takeout? 🥡
Get 10 meals you can make faster than delivery arrives. Seriously.
One email. No spam. Unsubscribe anytime.
Instructions
- Prep the tin:
- Line your mini muffin tin with paper liners, laughing if you find your liners mismatched—the more celebratory, the better.
- Make the pretzel crust:
- Mix crushed pretzels, melted butter, and granulated sugar in a bowl until the scent reminds you of movie theater snacks.
- Form and chill crusts:
- Spoon about a tablespoon of pretzel mixture into each liner and press firmly; the sound of crunching lets you know you’re doing it right. Pop the tin into the freezer for 10 minutes—this step gives you time to sneak a taste test.
- Prepare peanut butter filling:
- Combine peanut butter, softened butter, powdered sugar, and vanilla in a bowl and beat until creamy; it should taste good enough to lick the spoon.
- Layer the filling:
- Drop about a tablespoon of peanut butter mixture over each chilled crust, smoothing gently with a spoon while resisting the urge to overfill.
- Melt chocolate:
- In a microwave-safe bowl, heat chocolate chips and coconut oil in 30-second bursts, stirring between each until glossy and smooth (patience pays off here).
- Finish with chocolate topping:
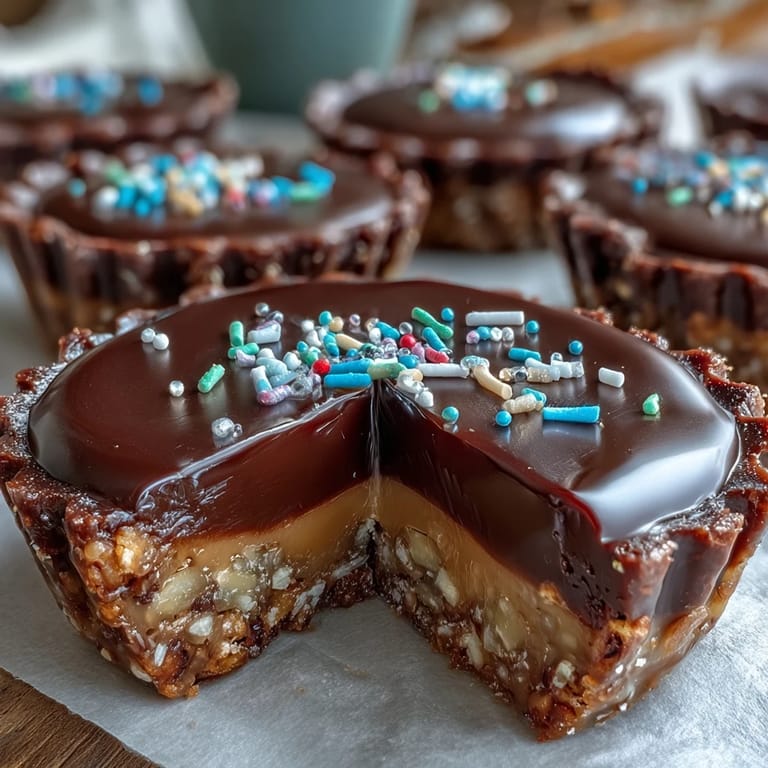
- Spoon melted chocolate over each peanut butter layer, letting excess drip for dramatic effect. Sprinkle each cup with colored sprinkles or flaky salt if you want a festive finish.
- Chill and set:
- Refrigerate cups for at least 30 minutes, then let anticipation build while the chocolate firms up.
- Store and serve:
- Keep the chocolate cups chilled until ready to serve; they’re best eaten straight from the fridge for maximum crunch.
 Pin this
 When little hands helped me add sprinkles to the finished cups one Easter morning, I realized these treats had become a small tradition. Each peanut butter egg was decorated uniquely, and the kitchen buzzed with giggles as we compared creations before devouring them with sticky fingers and smiles.
Pretzel and Chocolate Pairing
The combination of crunchy salty pretzels and smooth chocolate always makes for a winning bite—don’t be afraid to experiment with different types of chips or pretzel shapes. I once swapped regular pretzels for twisted ones, and it gave the cups a fun texture variation.
Make Ahead for Holidays
These cups are a dream for busy holidays because you can prep them days in advance and chill until guests arrive. Even after a few days, they stay fresh and the flavor deepens as the layers meld together.
Easy Allergy Adaptations
To make these safe for everyone, I’ve tried using almond butter and gluten-free pretzels—both worked beautifully. Double-checking labels for hidden allergens is crucial, especially for packaged chocolates and pretzels.
- If your peanut butter layer turns out dry, mix in a splash of milk.
- Dark chocolate intensifies the flavor—great for true chocolate fans.
- The cups taste best when served cold, so don’t skip the final chill.
 Pin this
 May your peanut butter eggs always bring joyful bites and a hint of childhood spirit, no matter when you make them. There’s always room for one more chocolate cup on any occasion.
Recipe FAQs
- → Can I make these gluten-free?
Yes, use gluten-free pretzels for the crust to accommodate gluten sensitivities without sacrificing texture or taste.
- → What type of peanut butter works best?
Creamy peanut butter offers the smoothest filling, but you can substitute almond or sunflower seed butter if desired.
- → How long do the chocolate cups keep?
These treats stay fresh for up to 5 days in the refrigerator, making them convenient for advance preparation.
- → Can I use dark chocolate instead?
Absolutely! Dark chocolate chips provide a deeper, richer flavor and pair well with the salty pretzel base.
- → Do I need special equipment?
You'll need a mini muffin tin, paper liners, mixing bowls, and a microwave-safe bowl for melting the chocolate.
- → Is it possible to add decorations?
Yes, sprinkle colored sugar or flaky sea salt on top for a festive touch and extra crunch.